Showing posts with label can. Show all posts
Showing posts with label can. Show all posts
Friday, February 21, 2014
How To Deck How Cedar Decking Can Expand Your Living Space
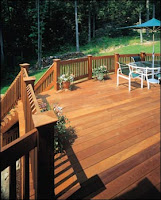
Cedar Decking
Outdoor living is growing steadily in popularity, which places increasing importance on your cedar deck, especially during the warmer months. It used to be the only functions of a cedar deck were to provide a place to grill hot dogs and burgers. However, with the widening availability of patio covers, weatherproof fabrics, and other deck design options, many homeowners now view the deck as an extension of the home. In fact, a recent study revealed most people place outdoor living rooms and grilling areas at the top of their list of preferred living spaces.Moisture is a concern, especially in the Pacific Northwest. When building a cedar deck, Portland homeowners are often restricted by the weather for ways to use the space. Thankfully, if you choose a deck design carefully, and plan the decks function in advance, you can create a fully-functional outdoor room. Here are five ideas for turning your deck into a purposeful outdoor living space.
1. Outdoor living room.
Outfit your deck with some weather protection with a patio cover, gazebo or over-sized umbrella. Make a fire pit or chiminea the focal point, but be sure to surround it with a non-flammable surface, such as deck tiles. Create a cozy lounge for entertaining or hanging out; decorate with an outdoor rug and sofa, and accent with lighting, textured fabrics and other accessories. Dont be afraid to borrow items from inside the home, as this will help create a sense of continuity. (Depending on the type of accessories and furniture you choose, you may need to remember to bring it in once the wet season hits.)2. Al fresco kitchen.
Grilling is one of the greatest ways to entertain outdoors, but hauling dishes back and forth is a real pain. Instead, consider creating an entire outdoor kitchen. Todays cedar decking can accommodate grills, sinks, refrigerators, storage cabinets and even brick pizza ovens. Include comfortable seating, ambient lighting and some sort of covering, like an aluminum patio cover or pergola.3. Party central.
A built-in bar, sink and mini-fridge can make hosting an outdoor party easier. Utilize the space by planning extra deck benches around the perimeter of your deck. Lighting is also important, especially if you are hosting evening parties. Provide enough light to see without brightening the space too much. Its also a good idea to install a patio cover so you dont have to move the party indoors when it rains.4. Multicultural getaway.
Whether you yearn for the striking colors of Morocco, or Zen garden tranquility, your cedar deck is the perfect place to experiment with those styles youre too afraid to try indoors. Begin with a bold outdoor rug, which will define the space and help you choose accessories.5. Private retreat.
The natural wood glow of your cedar decking creates an ideal private oasis. Consider a hammock or over-sized chair to provide luxurious seating, and add calming elements like plants, wind chimes, and a water fountain. Choose lush fabrics in soothing, neutral tones, and hang screens or lattice for privacy.Your outdoor living space should have a distinct function, just like every other room in your house. Plan your cedar deck design to accommodate the way you want to actually use your deck, and your outdoor room can rival those in the magazines.
Woodworking Plans

Tuesday, February 18, 2014
We can rebuild it we have the technology!
 I have began the process of rebuilding the hand saws in my shop, replacing the crap plastic handles with wooden ones. The process did not begin so smoothly though, it started with a few fits and at least one loud outburst of cursing. The only good size power tool I retained when moving into the new shop was my bench top bandsaw. I had my wider 1/2 inch blade in there for re-sawing some pine for a few Christmas projects, and I wanted to change it to the 1/8 inch blade to do the tight corner cutting the handle templates required. Today the bandsaw and I just could not get along, getting the blade aligned on the tires and tensioned...well it only lead to the swearing I alluded to earlier. After a breath, I rethought my process; really my recent reasoning has been to try and do more hand tool work, but as long as I let it, the bandsaw was going to let me continue the power tool habits Ive developed. I pushed the saw to the back corner of the bench top and reached for the coping saw.


 I started by tracing the patterns onto the poplar board. Why poplar??? Because it is the only hard wood board of enough width in the shop... so use what youve got I guess. Well see how it holds up and if it fails then well consider this a test run. You can see from the changing pencil lines in the pic that I took the original templates and modified them a bit to fit the size of my meat hook hands. I chopped off the larger blank chunks in the board with the backsaw, split between the two handle blanks with the coping saw and then systematically went to work working the shapes from the blanks. One based on an open handle Lie Nielsen dovetail saw and a the other based on a early 1900s Henry Disston & Sons "D" handle tenon saw. Thank god for the internet that helped me find several usable templates
To cut out the opening in the "D" handle, I clamped the piece to the bench and pulled out the brace and bits to keep with the hand tool mojo. The you disassemble the coping saw, string the blade through the drilled hole and reassemble the saw. That was it for the evening. I decided to stop there with the blanks and continue to work on the shaping and setting tomorrow.

Subscribe to:
Posts (Atom)